Tuesday, September 11, 2007

How does your garden grow?

I'm told every gardener has at least one year like this... I imagine that's supposed to make me feel better as I look at this dismal forest of stalks and can hear the munching of gazillions of not-so-tiny mouths.

Warnings of "don't waste your time this year" were abundant right from the beginning! Nothing seemed to come together easily... from the change to raised beds to the #@*#/! bugs in my seed storage bin, making store bought seed a necessity. The weather was capricious and seemed to have a malicious sense of humor, waiting patiently until each planting was the ideal size and tenderness to easily target with hail or unreasonably late freezes.

The fruit went first. Trees loaded with blooms and tiny peaches became barren wastelands of frozen branches and shriveled nubs of once future preserves, jams, jellies and succulent snacks.

My poor squash never sprouted at all. Peas made a valiant effort and supplied our table for a couple of pickings before hail took out most of them. Snow peas loved the cool weather and were going like gangbusters until a visiting puppy decided that lush half-barrel was just made for digging in. She had so much fun I couldn't even be terribly angry as I walked out the door to see her sitting and grinning proudly, covered in dirt with a mouth full of tasty greens, in the middle of the now half empty barrel. Blatant cuteness has saved many a life.


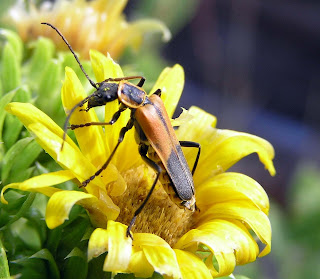
Sunflowers grew weird with multiple heads and small seed like they had crossbred with wild strains. Mind you, I purchased this seed (Grey Striped Giants) fresh. The flowers were a beautiful array of yellows and reds and brightened the mornings until those pretty little beetles arrived. Short work was made of my tall, svelte beauties before I even knew there was a problem afoot. Winter birds will have a lean time of it this year.


The corn knew better... it barely bothered to break ground. A handful of spindly stalks showed timid faces before the hail beat them to the ground. Late in the season, a few more tried their luck and almost made an ear or two before the final devastation arrived... grasshoppers.

It started with waves of movement as you walked across the yard. The cause of all this activity required close inspection to identify. I have never seen so many or such small grasshoppers in one place in all my life! I frantically put diatomaceous earth on everything without blooms. (Why without blooms? We had a bee colony move into a barrel on the property and I didn't want to risk killing them too.) Sevin dust came later, but even it made no dent in the horde. They grew in size and numbers until I simply gave up.


When people ask me what I am growing this year I sadly reply... grasshoppers... grasshoppers, crickets and spiders.


This year, I have seen grasshoppers and crickets that I have never noticed before! There are the usual assortment of red wing, brown stripe, iridescent blues and greens in abundance.


Now we have a solid black stealth grasshoppers and tons of gorgeous maroon colored crickets that I am told are Mormon Crickets. According to the USDA-ARS "The current upsurge of Mormon crickets in the western U.S. is one of the most severe infestations on record..."


With the explosion of food, the spiders have flourished! These are great giants that give old women and small children nightmares… Huge, fat creatures that I owe a debt of gratitude to for my only crop this year. They saved the tomatoes from the hoppers and sometimes they protect them even from me. It takes me an hour of dread before I can bring myself to approach the rank overgrowth that is my tomato patch. For two hours after a picking I am squeamish and jumpy, feeling crawly and watching for tiny offspring in clothing and hair. Intellectually, I know this is silly but instinct takes over and my skin is hyper-alert to the slightest touch or movement.


These babies have abdomens as big or bigger than the pad of my thumb! Webs stretch three and four feet across, catching even the largest grasshoppers with ease! They are Golden Orb Weavers or Banana spiders I am told by my Cajun hubby. (The egg sack pictured measures about one inch across!) Evidently, they are quite common in the swamps of Louisiana and I'd like to know what the heck they are doing out here in the desert! lol They might have been here, but I never saw anything like this growing up. Probably wouldn't have ever started gardening if I had!
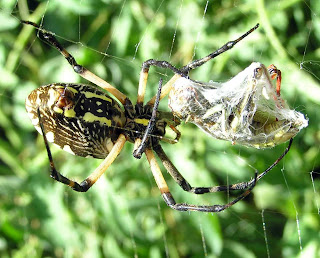

Irrational fear aside, I have grown quite fond of my crop of spiders. I hope they stick around... just not too close... for next year's garden. I really dislike any form of pesticide and they are exceptionally efficient at their jobs.


Actually, I gained a new hobby from all this disappointment... bugs! They are fascinating. Many are stunningly beautiful and some are down right alien looking, like the preying mantis that found my camera interesting enough to stalk.


So, not all is lost and I have already planted my winter greens and am trying for some squash one more time, even though it is a bit late. If they come up I might be encouraged enough to build a couple of hot houses around them, providing frames that could become screened shelters against next year's crop of hoppers. Live and learn.


Friday, September 7, 2007

How does your garden grow?


When I find out how to get the photos and text into proper alignment (it keeps changing when actually posted), I will repost this! GRR!

Saturday, March 31, 2007

Gardening with Wildflowers - Phacelia

The vegetable gardens are still in the process of being changed over to raised beds, but our wildflowers are in full bloom. Pictured is Phacelia integrifolia, also commonly known as Scorpion Weed, Wild Heliotrope or Gypsum Phacelia. It is lovely used as an ornamental and is beginning to be widely used as a cover crop or "green manure".

There are about 200 species of the genus Phacelia. They grow wild, are cultivated as ornamental ground cover or in container gardens almost world wide.

When used as a cover crop, they are usually planted in late August in the temperate zones and winter over until late February or very early March. For full benefit as a green manure, they should be tilled or turned into the soil prior to the first blooms. This particular species does not fix nitrogen in the soil, but due to its vigorous growth, will prevent most weeds getting a foothold in fallow ground. The plants do not make a woody stem and break down quickly once tilled so they are a ready source of nutrients for the new spring crop. Their dense growth habits also help prevent erosion and topsoil loss due to winter storms.

They are exceptionally easy to grow in containers. This species is partial to gypsum and caleche or alkaline soil. Many others will do better in standard potting soils. Seed packets and nursery stock will have any special requirements noted in the instructions provided.

The photos are a bit misleading. Each flower is only about 1/4" across and the plant pictured here is less than 6" tall. This can vary a lot with the water and nutrients available, as well as the species. They come in different colors ranging from white to pale pink and pale blue to deep purple.

It is one of my favorites, but some caution is advised. A skin rash similar to poison oak or ivy rashes can occur in sensitive individuals. They can also be somewhat invasive to surrounding yard and field because they seed so readily.


Friday, March 9, 2007

Preserving the Future

Most of us shop for produce in our local markets without much thought to what we are purchasing beyond how it looks and tastes. This has fostered what I consider to be dangerous changes in the way our food is grown and treated for marketing. Genetic alterations in consumable plants (called transgenic crops), hybridization that makes for sterile seed production and radiation treatments that are designed to preserve freshness for unimaginable lengths of time are all a part of some of the most potentially beneficial and frightening changes in our food sources today. If you are unaware of these developments, you owe it to yourself and your family to take a look at the embedded links. What you don't know might prove harmful in the long run!

Making a conscious effort to purchase heritage and heirloom plants and seed will encourage growers to produce more of these varieties. Taking care to note the small stickers on your fruits and vegetables and what they say will sometimes let you know if your market is carrying genetically altered transgenic or irradiated produce. Learn what science is doing to our food, why, the potential benefits and the potential hazards!

Better yet, grow as much of your own fruits and vegetables as you reasonably can. As you harvest your crops, save some of the seed for next year. Over a few seasons these plants acclimatize to your specific area and will develop hardier, healthier plants. Help preserve our food source in this way and you just might be helping to ensure the future of coming generations.

First Bloom of Spring!

Here it is folks! My first bloom of Spring! Okay, so it isn't a garden plant, it's an Amaryllis.
I am completely excited about this one though. I have carried this bulb around for 8 years and it never bloomed again after the first time. I don't make effort to force the blooms the way you are supposed to do and always enjoyed the foliage on its own, so it was never an issue. Much to my delight, it has put off a pup (another bulb) and obviously decided to celebrate the event with three magnificent blooms.

Be sure to come back by towards the end of March, when I will be posting some photos of the progress on the changes in our gardens. It is coming along, but will require most of my attention for a few days and lots of labor! So, until then...

Best planting days for March are:

Root crops: 8th, 9th, 13th, 14th and 17th
Above ground crops: 18th, 21st, 22nd, 25th, 26th and 27th
Flowers & Herbs: 25th, 26th and 27th
Transplanting: 18th, 21st and 22nd

Wednesday, March 7, 2007

Growing Morning Glories

Sometimes you just have to plant some blatant food for the soul! Summer mornings without the colorful riot of morning glory blooms across my back fence just wouldn't be complete.

Morning Glories are embarrassingly easy to grow and add a festive touch to any yard. With a little creative planting you can hide an ugly area or make a shaded arbor to sit under.

Wait to plant them until about a week prior to the last frost in your area. You can check The Old Farmer's Almanac charts and the USDA Hardiness Zones, through the US National Arboretum, for your area's information. International information is also available on the USNA site.

These delicate beauties can vine up to 15 feet and will need support. A trellis, tree stump or old wire fence is ideal. If you have a privacy fence you will generally need to tack a layer of chicken wire, lengths of string or other support near the ground and up the fence to get nice coverage.

The location you chose needs full sunlight and average soil. Loosen the soil to about 2" deep so it will be easy for the roots to grow and will hold moisture better. Saturate this with water a day or two before you are ready plant. Soaking the seeds for about 24 hours in warm water prior to planting softens the outer hull and hastens germination. Without this it can take two to three weeks to see your first sprouts, sometimes longer!

Plant seeds about an inch deep with soil lightly patted down over them. Keep it evenly moist until you see the first heart shaped pairs of leaves. Once established, morning glories are fairly drought tolerant and will require less watering. You will get even more profuse flowering if you lightly fertilize once a month after they start blooming. With very little further care you should have a lovely morning display right up until the first hard frost.

Morning glories are annuals, but they reseed themselves readily. So readily, in fact, that they can become a real pest if you aren't careful! Do not plant them close to trees or shrubs. They will climb whatever they can reach. Their vines become so numerous and the foliage so dense that they can damage limbs with their weight and cut the other plant's ability to receive enough light to survive. Choosing a location that can be mowed right up to the edge of the Glories will help. Regular close mowing helps by preventing their spread into unwanted areas.

Some cut the dead vines away from their support in the late fall and dispose of them. Mine are on a stout fence and I usually leave a season or two in place to achieve a bulkier look. As the vines quickly reach the top of the fence they begin to drape over in a lovely cascade of color. I do gather as many of the seed as I can once all the pods are dry. This helps prevent serious over seeding, which will create problems with next year's growth unless regularly thinned all through spring. Gathered seeds make a nice gift, tied up in a wisp of cloth with a ribbon, to be given to gardening and non-gardening friends. Morning Glory is especially nice for the "brown thumbs" who've never been able to grow anything with success!

The easiest way to collect the seed is to use a cookie sheet. Press the edge of the pan against the plants' support. Begin to crumble the clusters of seed pods with your free hand, catching the chaff and falling seed in your pan as you go. As you fill the pan, empty it onto an old sheet or tarp. When you have gathered as much of the seed as you want, you will then need to clean it. Pull out all the stems and trash you can. A stiff breeze will help you with the next step so you might want to save this action for a slightly blustery day. Gather the seed into a bag and making sure the wind is hitting your back,slowly pour them back out onto the tarp. This is a style of winnowing. What you are doing is allowing the wind to blow away the lighter chaff of seed hulls and debris as it is falling. Once cleaned of debris, bag the seed in air tight containers for winter storing or Christmas giving.


Tuesday, February 6, 2007

I'm Late, I'm Late for a Very Important Date!

Here it is, February already and I haven't even started preparing the garden! Usually in November, we would have tilled the old garden, turning in the remaining plants and adding compost so it would 'age' over the coming months. This year we are switching to a different style of garden and I am way behind on getting it set up!

Raised beds with intensive, companion planting methods is easier on the back and less time consuming once set up. I just can't keep up with the weeds anymore! This style of gardening, along with container methods, is easier to maintain. It also allows for more conservative water use by concentrating water where it is needed most rather than letting it leach out into the surrounding soil.

I will be container planting some lettuce, mustard greens and Swiss chard on the 18th and 19th of this month. That is when the moon is in Pisces and is good for planting above ground crops. These leafy greens like cool weather and do well here in the early spring and over the winter. In summer it is nearly impossible to keep them from becoming bitter and bolting due to the heat.

For those who use cold frames or start seeds indoors for transplanting outside, this is also a good time to begin for early spring plantings. A list of most beneficial planting days for February is provided below.
  • root crops from the 7th through the 11th and the 14th and 15th
  • herbs and flowers from the 7th through the 9th and on the 27th and 28th
  • above ground crops like tomatoes on the 18th, 19th, 22nd through 24th and again on the 27th and 28th

Wednesday, January 31, 2007

Indoor and Patio Gardens, Replace those Ornamentals with Something Good to Eat!

Having a patio or indoor garden is much easier than you might think!
The main considerations are space, light and what herbs and vegetables you actually like and will use. All of the suggestions I have provided here can be grown in standard or specialty potting soils readily available at most department store garden centers. If there are special requirements regarding the planters used, it will be noted, but most will do fine in nearly any container that is big enough and has drainage holes. Be creative!

I do encourage the use of heritage or heirloom seeds. These plants produce seed that may be saved and grown next year. Too many of the new hybrids available won't grow true to type, if at all. Even though many of us prefer using 'starter' plants, making a point of purchasing proven reproducers encourages nurseries to grow and sell those types. This safeguards our food sources for the future.

Unless otherwise noted, there are a few basic principles that will apply to nearly every container grown plant. Observing these will greatly increase your chances of success.
  • Good drainage is critical. Over watering and/or using pots that force the plant's roots to sit in water are the most common causes of sickly or dead plants. Using a deep enough pot with one inch of clean, coarse gravel in the bottom is advised. Each pot should have one or more holes in the bottom or sides. Most commercial pots have these already. Using creative containers will usually require drilling a few (3 to 5) small holes in the bottom or on the side just above the base.
  • Good light is vital for fruit and vegetable production. Each plant has a fairly broad range of tolerance, but will produce best in a location that provides the ideal number of hours and strength of light. These ideal requirements will be noted, as will tolerance ranges if available.
  • Pick ripe fruits and trim leafy herbs regularly. This will increase production. If you let fruit rot on the vine or go to seed, new production will slow or stop entirely. Leafy herbs will attempt to make seed as well. Keeping them trimmed encourages continued new growth.
  • Regular feeding with an organic fertilizer is a must for container vegetable gardens! To learn more about these, click here. This is a fairly comprehensive list of different types. It is a commercial supplier, but I don't know anything about them, just liked their information and have used it with good results. Herbs, as a general rule, don't like overly rich soil or fertilizer.
First, make a list of some of the herbs you favor using and the common veggies that are family favorites. Consider the available space and light where you might want to have plants. Looking at the following list of plants and their requirements, you should be able to get an idea of some good choices for healthy and delicious ways to pretty up that patio and window! This list is an idea prompt only! It is a place to begin thinking outside of the "houseplant" box.

  • Tomatoes Several varieties of tomatoes are suitable for container gardening. Most notable, of course, are the Cherry and Patio varieties. These are compact plants with small to medium fruit that produce well in at least 6 to 8 hours of direct sunlight. No matter which variety you choose, look for sturdy, compact plants. Small and medium fruits are the most tasty, in my opinion. Tomato plants dislike having wet leaves, so water at the side or base of the plant. Keep soil damp, but not soggy. Watering once a day in dry weather is recommended. If you use clay pots and live in a dry, hot region it is best to water twice a day. I have managed to grow cherry and patio variety tomatoes inside over the winter. They must be very near maturity by the time light starts to weaken in the fall. A window that provides a good, solid 8 hours of bright light a day is a must. You can supplement with standard fluorescent or incandescent lighting if available.
  • Squash Although most types of squash will vine and take up huge amounts of space, I have managed to grow two old-time favorites with good results... Yellow Crookneck and Black Beauty Zucchini. You will need a good 3 to 4 foot area for each plant since they bush out with large beautiful leaves. Although considered 'bush' varieties, these will often put off runners too. I usually just keep them clipped back (do this early in their growth) to fit the space I have available. These plants require as much direct sunlight as possible in cooler climates, but do well in light shade in the hotter regions. They like to be watered every day and kept moist so long as they have good drainage. Container should be fairly large to provide support and room for developing fruit. One to two healthy plants will produce enough squash for a family of four to get tired of it before the end of summer.
  • Radish, Green Onion, Chives Quick growing, undemanding and tasty... These are a zesty additions to any window garden! All of these can even be grown in an old sheet cake pan, recycling what would otherwise be just more trash! There are many varieties to choose from and all I have tried were remarkably easy to grow. You will need bright to direct sunlight for at least 5 to 6 hours a day (no direct sun for very shallow containers due to heat issues). These vary a little on moisture preference, so check growing instructions. Onions will need a deeper container if you want the classic white 'neck'. This is achieved by banking additional soil up the plant as it grows.
  • Lettuce There are many types of lettuce available. Some have very attractive, colorful leaf patterns and make great window plants. Almost all lettuce likes it cool and will do well in 6 to 8 hours of bright light to light shade. Only in cooler climates does it seem to do well in direct sunlight during the late spring and summer. Requirements vary with the type, but most like rich, moist, well drained soil.
  • Basil Very easy to grow plant that does well in the house over winter with a bright window location. The biggest issue I have with my indoor Sweet Green variety of basil is that it grows faster than I use it! Easily rooted from cuttings in a glass of water, it is a perfect 'gift' plant to pot up and give to friends and neighbors. This herb likes ordinary, well drained soil and bright light to full sun. Keep it trimmed for continual growth since it will die back once it has gone to seed. This plant is a good companion plant for your tomatoes, repelling insects and improving growth and flavor. Use a larger pot or a longer planter box to grow them together.
  • Rosemary I have never been able to start rosemary from seed. Plants purchased have always done well in containers, but must be brought in over the winter to protect from hard freeze. It likes well drained soil that is allowed to dry a bit between watering's. Very bright light to direct sun is preferred, but it will survive with much less over winter months in most places. Rosemary makes a beautiful, fragrant shrub that is good in many dishes, as a tea for colds and headaches not to mention a lovely decorative accessory.
  • Dill and Parsley Both of these make excellent patio or windowsill plants that can be used medicinally and in cooking! Easy to grow in ordinary potting soil with bright light to direct sun. Parsley may be companion planted with tomatoes. They like well drained soil and being allowed to dry a little between watering's. Clip regularly to encourage new growth.
  • Chamomile Not only does this herb have lovely, fragrant flowers, it is one of the best calming teas I have ever used! Easy to grow in containers, it likes average to rich soil, very bright to full sun light and consistent moisture. Harvest flowers at peak bloom and use fresh or dry in a dark, dry place (paper bag with a few small holes for air circulation works nicely). May be used as a sachet (dried), hot or cold tea and added fresh to punch for decoration and flavor. This is one herb that like to be fertilized on a regular basis.
Admittedly, these are only a few of the eatable and/or medicinal plants suitable for patio or indoor growing. Even this small list might help get us started thinking in terms of decorating with plants we can use. By exchanging strictly ornamental plants for those that provide nutrition and health benefits, we become more environmentally friendly as well. Expand on these benefits by using gray water (bath & dish rinse waters) when you can to water your garden, but only when you monitor the soaps used for safety with food sources. Learn about simple composting of the clippings and waste. This can be done in fairly small containers and used as a fertilizer back on the garden. Increase the value of this by recycling containers to grow plants in such as Styrofoam coolers, plastic coffee cans for smaller plants and even old trash cans. These can be decorated by painting or using discarded cloth or paper as a mache type coating. The possibilities are endless and the gains might be of great value in the years to come.